
I had a 44-button LED remote and wanted to use it with a new addressable strip. The idea was to keep the handy bits of the old setup: one press for a colour, another for a timer, and a proper OFF button. WLED would look after the pixels and effects rather than having to have WLED mobile app. Surprising how straightforward it was to capture all codes from existing old remote from another LED strip.
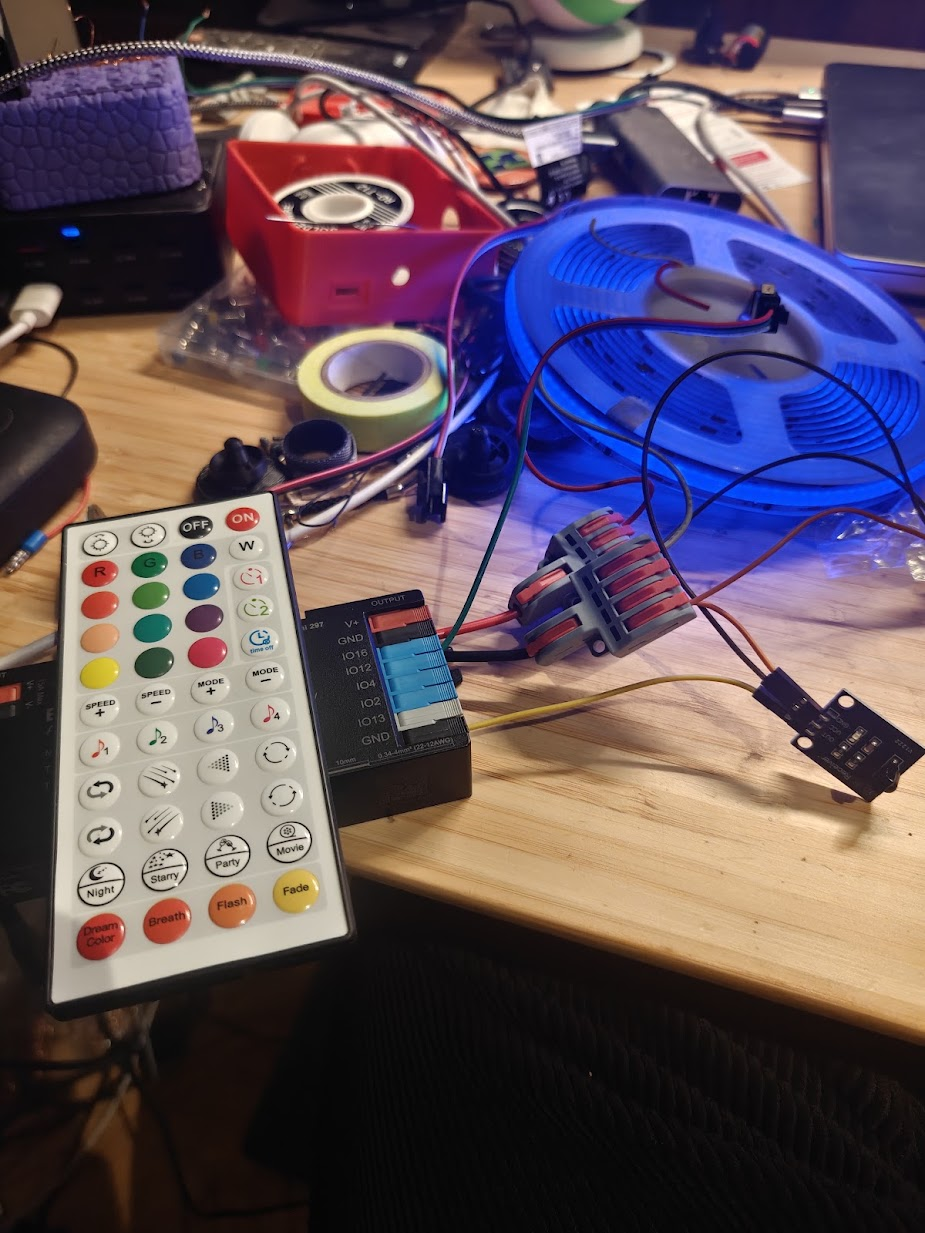
What went into the build
- Gledopto Elite 4D-EXMU (GL-C-618WL). This ESP32 controller already had WLED running. It has an exposed
IO13terminal for the receiver signal, USB for reading the serial log, and a built-in mic for the music modes. Controller listing. - 12 V WS2811 RGB COB strip. The dense COB strip gives a smoother line of light, and the addressable sections let effects move along it. A 12 V DC supply powers the controller and strip. Strip listing.
- 44-button remote and a 38 kHz IR receiver. The handset already had the controls I wanted. The receiver turns its infrared pulses into a signal the ESP32 can read. The Youmile kit contains both a receiver and a transmitter, so check the markings before wiring one in. IR kit listing.
- 3.3 V regulator. This gives the receiver its own low-voltage feed from the 12 V supply. It also lets the receiver stay awake when the strip is off. Regulator listing.
Putting it together on the bench
- With the power disconnected, I connected the strip to the Elite’s LED output and set the strip type and addressable pixel count in WLED.
- I connected the receiver’s
OUTpin toIO13and tied the receiver, regulator and controller grounds together. The receiver’s supply pin takes the regulator’s 3.3 V output. Check your module’s pin labels and measure its supply before connecting it. - In Config → LED Preferences, I set IR GPIO to 13 and selected JSON remote.
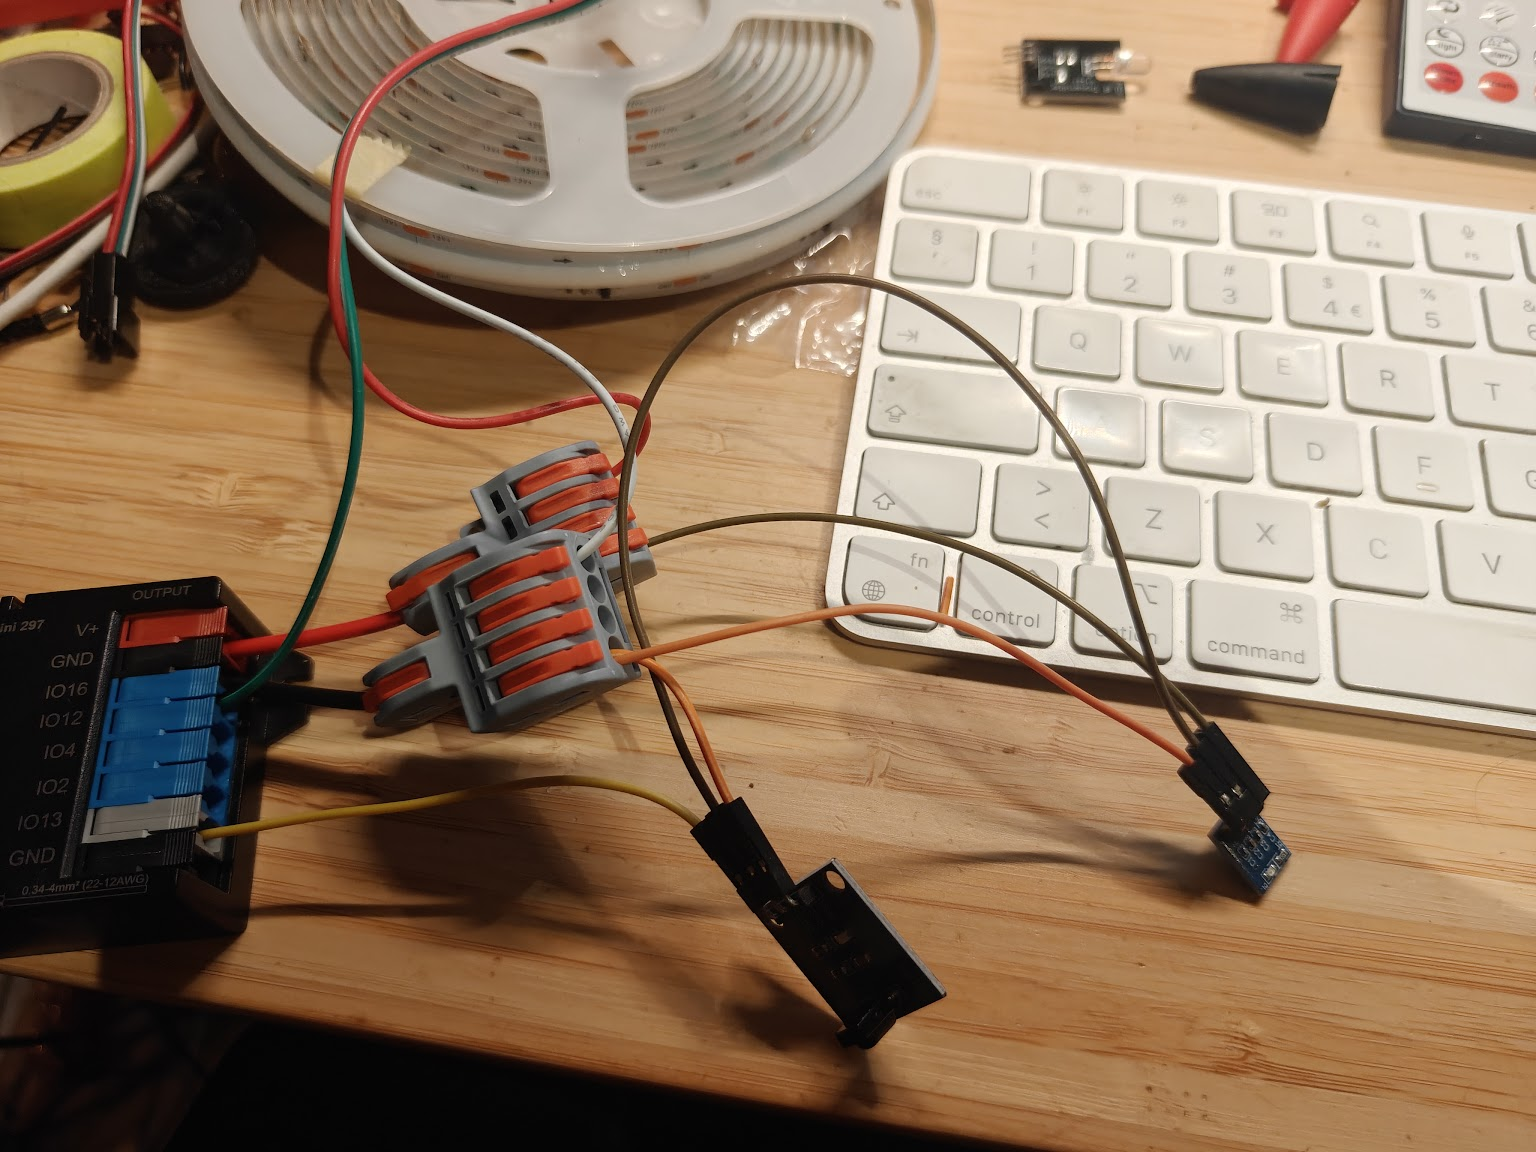
The first test exposed a wiring mistake. I had fed the regulator from the Elite’s OUTPUT V+ terminal. OFF worked, but the little receiver went dark with the strip and couldn’t hear ON. The Elite’s relay intentionally cuts power to the LED output. Gledopto relay documentation.
The fix was to move the regulator’s input to the 12 V feed before the relay. That leaves the receiver powered and lets the controller still cut power to the strip. This is the final wiring layout.
12 V supply + ──┬── Elite INPUT V+
                └── regulator VIN
12 V supply − ───── common GND: Elite, regulator, IR receiver
Regulator 3.3 V ─── IR receiver VCC
IR receiver OUT ── Elite IO13
Elite LED OUTPUT ── LED strip power and data
Capturing and mapping the keypad
I connected the Elite by USB and listened at 115200 baud. Each button press appears as a hex code in the serial output. I worked left to right, one row at a time, tapping each button several times so I could tell a repeatable code from a stray reading. WLED’s custom IR guide.
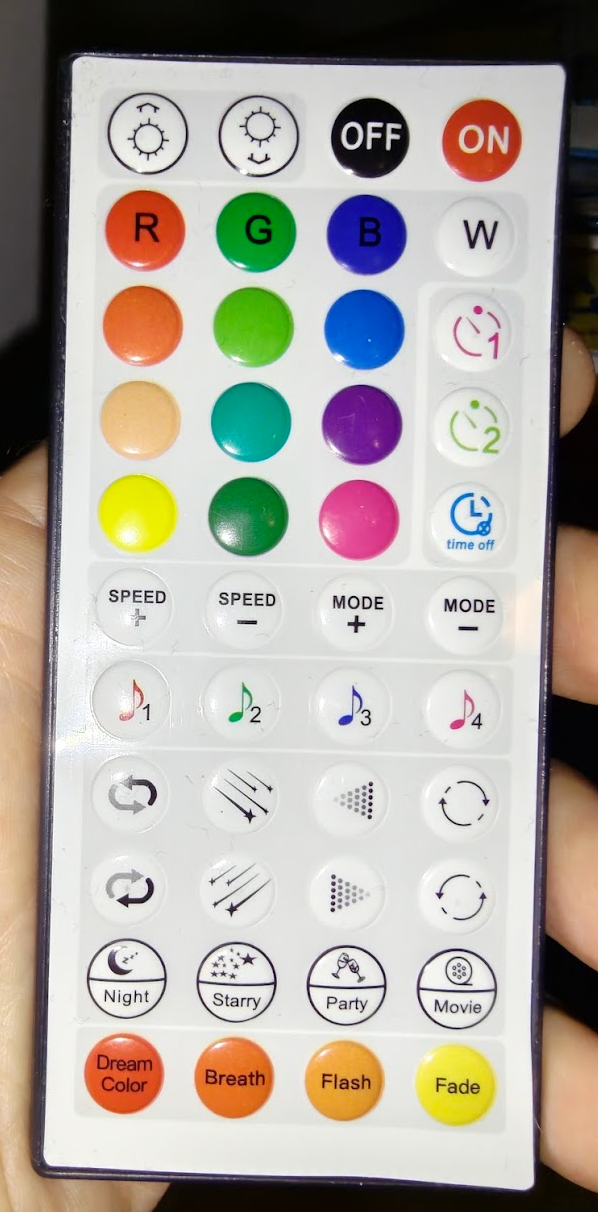
I started the ir.json file with ON and OFF. The keys are the codes from this handset, and the cmd entries tell WLED what to do.
{
  "0xFF02FD": {"label": "ON",  "cmd": {"on": true}},
  "0xFF827D": {"label": "OFF", "cmd": {"on": false}}
}
From there I added brightness, colours, the one- and two-hour timers, and the speed and mode buttons. The arrow keys run four animations in both directions. The music keys select effects driven by the Elite’s microphone, while the bottom rows give quick access to scenes such as dim amber for Night and a rainbow chase for Party.
All 44 codes
Expand the mapping below, copy the JSON into a file named ir.json, and upload it from WLED’s LED Preferences with JSON remote selected. This is the mapping from this handset and the Elite running WLED 0.15.4. If you’re using a similar-looking remote, capture its ON and OFF codes first to see whether they match.
Show all 44 IR codes and commands (ir.json)
{
  "0xFF02FD": {"label":"ON","cmd":{"on":true}},
  "0xFF827D": {"label":"OFF","cmd":{"on":false}},
  "0xFF3AC5": {"label":"Brightness +","cmd":"!incBrightness"},
  "0xFFBA45": {"label":"Brightness −","cmd":"!decBrightness"},
  "0xFF1AE5": {"label":"Red","cmd":{"seg":{"fx":0,"col":[[255,0,0]]}}},
  "0xFF9A65": {"label":"Green","cmd":{"seg":{"fx":0,"col":[[0,255,0]]}}},
  "0xFFA25D": {"label":"Blue","cmd":{"seg":{"fx":0,"col":[[0,0,255]]}}},
  "0xFF22DD": {"label":"White","cmd":{"seg":{"fx":0,"col":[[255,255,255]]}}},
  "0xFF2AD5": {"label":"Orange","cmd":{"seg":{"fx":0,"col":[[255,96,0]]}}},
  "0xFFAA55": {"label":"Lime","cmd":{"seg":{"fx":0,"col":[[128,255,0]]}}},
  "0xFF926D": {"label":"Light blue","cmd":{"seg":{"fx":0,"col":[[0,128,255]]}}},
  "0xFF12ED": {"label":"Timer 1 (60 minutes)","cmd":"NL=60&NT=0&NF=0"},
  "0xFF0AF5": {"label":"Peach","cmd":{"seg":{"fx":0,"col":[[255,180,100]]}}},
  "0xFF8A75": {"label":"Teal","cmd":{"seg":{"fx":0,"col":[[0,200,175]]}}},
  "0xFFB24D": {"label":"Purple","cmd":{"seg":{"fx":0,"col":[[128,0,200]]}}},
  "0xFF32CD": {"label":"Timer 2 (120 minutes)","cmd":"NL=120&NT=0&NF=0"},
  "0xFF38C7": {"label":"Yellow","cmd":{"seg":{"fx":0,"col":[[255,255,0]]}}},
  "0xFFB847": {"label":"Dark green","cmd":{"seg":{"fx":0,"col":[[0,100,45]]}}},
  "0xFF7887": {"label":"Pink","cmd":{"seg":{"fx":0,"col":[[255,0,128]]}}},
  "0xFFF807": {"label":"Timer Off","cmd":"NL=0"},
  "0xFF18E7": {"label":"Speed +","cmd":"SX=~16"},
  "0xFF9867": {"label":"Speed -","cmd":"SX=~-16"},
  "0xFF58A7": {"label":"Mode +","cmd":"FX=~"},
  "0xFFD827": {"label":"Mode -","cmd":"FX=~-"},
  "0xFF28D7": {"label":"Music 1 (Gravimeter)","cmd":"FX=132&FXD=1"},
  "0xFFA857": {"label":"Music 2 (Freqwave)","cmd":"FX=137&FXD=1"},
  "0xFF6897": {"label":"Music 3 (DJ Light)","cmd":"FX=159&FXD=1"},
  "0xFFE817": {"label":"Music 4 (Ripple Peak)","cmd":"FX=148&FXD=1"},
  "0xFF08F7": {"label":"Chase (reverse)","cmd":{"seg":{"fx":28,"rev":true}}},
  "0xFF8877": {"label":"Meteor (forward)","cmd":{"seg":{"fx":76,"rev":false}}},
  "0xFF48B7": {"label":"Wipe (reverse)","cmd":{"seg":{"fx":3,"rev":true}}},
  "0xFFC837": {"label":"Colorwaves (forward)","cmd":{"seg":{"fx":67,"rev":false}}},
  "0xFF30CF": {"label":"Chase (forward)","cmd":{"seg":{"fx":28,"rev":false}}},
  "0xFFB04F": {"label":"Meteor (reverse)","cmd":{"seg":{"fx":76,"rev":true}}},
  "0xFF708F": {"label":"Wipe (forward)","cmd":{"seg":{"fx":3,"rev":false}}},
  "0xFFF00F": {"label":"Colorwaves (reverse)","cmd":{"seg":{"fx":67,"rev":true}}},
  "0xFF10EF": {"label":"Night","cmd":{"seg":{"fx":0,"pal":0,"rev":false,"col":[[255,120,24],[0,0,0]]},"bri":8}},
  "0xFF906F": {"label":"Starry","cmd":{"seg":{"fx":80,"pal":36,"rev":false,"sx":96,"ix":80,"col":[[200,220,255],[0,0,6]]},"bri":32}},
  "0xFF50AF": {"label":"Party","cmd":{"seg":{"fx":30,"pal":11,"rev":false,"sx":144,"ix":128,"col":[[255,255,255],[0,0,0]]},"bri":80}},
  "0xFFD02F": {"label":"Movie","cmd":{"seg":{"fx":0,"pal":0,"rev":false,"col":[[32,80,255],[0,0,0]]},"bri":16}},
  "0xFF20DF": {"label":"Dream Color","cmd":{"seg":{"fx":67,"pal":11,"rev":false,"sx":104,"ix":128}}},
  "0xFFA05F": {"label":"Breath","cmd":{"seg":{"fx":2,"pal":0,"rev":false,"sx":96}}},
  "0xFF609F": {"label":"Flash","cmd":{"seg":{"fx":1,"pal":0,"rev":false,"sx":64}}},
  "0xFFE01F": {"label":"Fade","cmd":{"seg":{"fx":12,"pal":0,"rev":false,"sx":80}}}
}
End of project one happy child with LED strip in there room.